Upgrade JSS 22.11 Next.js apps to version 22.12

Upgrading a Sitecore JSS 22.11 Next.js application to version 22.12 might look like a small version change, but in reality, it involves several important updates. Because every project is a bit different—especially in the JavaScript and Next.js world—you may need to make additional adjustments depending on how customized your application is.
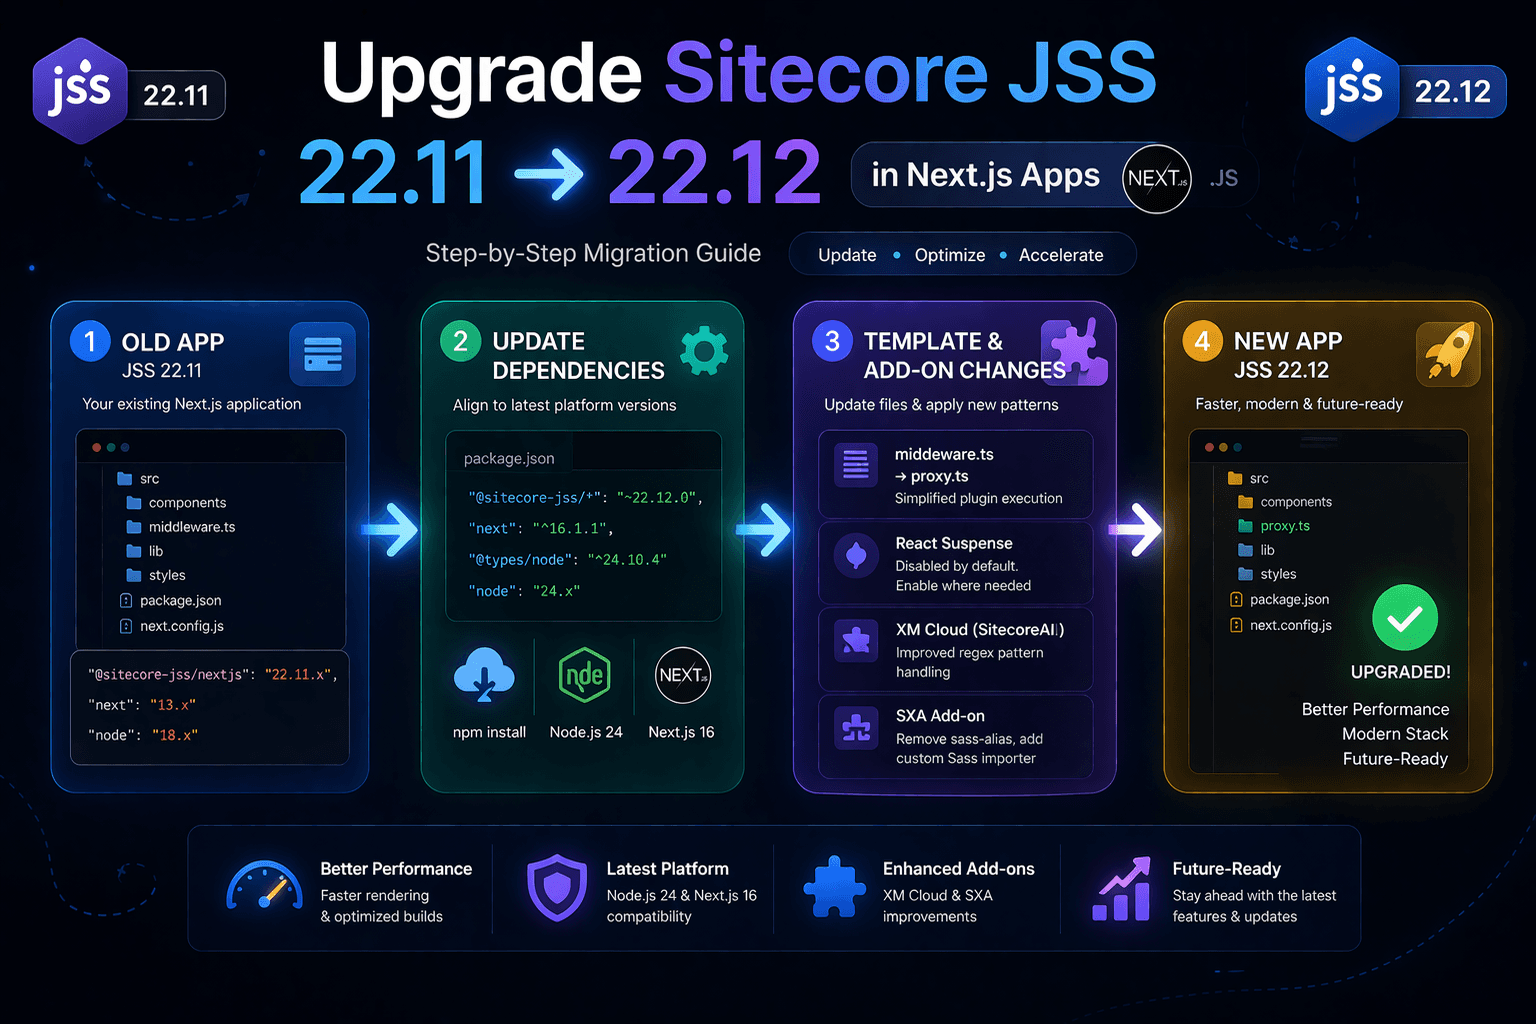
Before starting, it’s a good idea to check which templates and add-ons your app is using. You can find these in your package.json. A typical JSS 22.11 setup, especially one based on the XM Cloud starter foundation, might include things like nextjs, nextjs-styleguide, nextjs-sxa, and nextjs-multisite. Also, keep in mind that XM Cloud is now being referred to as SitecoreAI, although you may still see the old name in code or documentation.
The first step is preparation. If your app isn’t already on JSS 22.11, you’ll need to upgrade to that version first. It’s also worth reviewing the changelog, especially if your application includes custom code. The changelog often highlights changes that might not be obvious but could still affect your implementation.
Once you’re ready, start by updating your dependencies. In your package.json, update all @sitecore-jss packages to version ~22.12.0. Along with that, you’ll need to align your environment with newer platform versions. Node.js is now version 24, and Next.js has been upgraded to version 16. This means updating related dependencies like @types/node and next. After making these changes, run npm install to install everything.
During this step, you might run into type-related issues. One common example is errors involving JSX.Element. If that happens, the fix is usually simple—just import the JSX type from React where needed. These kinds of issues are normal when working with newer versions of TypeScript and React.
To make the upgrade process easier, it’s highly recommended to create a fresh JSS 22.12 Next.js application. This gives you a clean reference to compare against your existing project. You can generate one using the create-sitecore-jss command and select the same options your current app uses, such as GraphQL or REST for data fetching, and SSG or SSR for rendering. Make sure to include the XM Cloud (SitecoreAI) add-on and any other add-ons your app depends on. Once created, this new project will help you identify exactly what has changed.
Next, you’ll need to update your existing app’s template files to match the new structure. One of the key changes here is that “middleware” has been renamed to “proxy.” This involves renaming the file from src/middleware.ts to src/proxy.ts and updating how it works. The new implementation no longer uses NextFetchEvent, so you’ll need to remove those imports and adjust your function signatures accordingly. The middleware logic itself is also slightly simplified, especially in how plugins are executed.
Another important change is related to React Suspense. In version 22.12, Suspense is disabled by default in placeholders to improve performance. This means components render faster, but there’s a trade-off. If your app relies on lazy-loaded components that show a loading state, you’ll need to explicitly enable Suspense for those placeholders. This involves reviewing where <Placeholder /> is used and adding a setting to re-enable Suspense only where it’s needed.
There’s also a small but important update in the XM Cloud (SitecoreAI) add-on. In the FEAASScripts.ts file, the function that converts patterns into regular expressions has been improved. The new version correctly escapes backslashes and dots, making pattern matching more reliable. It’s a minor code change, but it helps avoid subtle bugs.
If you’re using the SXA add-on, you’ll need to make more significant changes. The sass-alias dependency is no longer used, so it should be removed from your project. In its place, you’ll implement a custom Sass importer that works with the newer Next.js 16 Sass API. This involves updating your sass.js configuration file, adding new logic to resolve aliases, and ensuring your styles are loaded correctly. While this might seem a bit complex, it’s a one-time adjustment that brings your setup in line with modern standards.
As you go through the upgrade, testing is essential. Run your application frequently, fix errors as they appear, and don’t ignore warnings—they often point to potential issues. Enabling debug logging can also help you identify problems specific to JSS.
In the end, upgrading to JSS 22.12 is about more than just staying up to date. It’s about improving performance, aligning with the latest platform changes, and making your application more maintainable in the long run. By taking a careful, step-by-step approach and using a fresh project as a reference, you can complete the upgrade with confidence and avoid unnecessary headaches.
Update application dependencies in your existing app
For your upgraded application to work correctly, you will need to update dependencies.
To update your dependencies:
In your existing application's package.json update every @sitecore-jss package to version ~22.12.0.
Update the following dependencies to the specified versions:
Node.js has been updated to version 24. You may need to apply changes not mentioned here to your app based on the Node.js 24 upgrade guide.
"@types/node": "^24.10.4",
Next.js has been updated to version 16. You may need to apply changes not mentioned here to your app based on the Next.js 16 upgrade guide.
"next": "^16.1.1",
Note:
If you see type errors related to JSX.Element (for example, in components like CdpPageView), add the following import where you use JSX.Element:
import type { JSX } from 'react'; - Install the dependencies with the following command:
npm install
Create a JSS 22.12 Next.js application
To simplify the upgrade process as much as possible, create a JSS 22.12 Next.js application with the XM Cloud add-on. You can then copy some files from this app into your existing app.
To create a JSS 22.12 Next.js application with the XM Cloud add-on included:
- In a console, run the following command:
npx create-sitecore-jss@22.12 nextjs
- If prompted to install the create-sitecore-jss@22.12 package, answer y.
- Enter the folder path for the JSS 22.12 Next.js app. For example, enter ./jss2212, to create the app folder in your current working directory.
- Follow the remaining prompts, selecting the same options for data fetching (GraphQL or REST) and prerendering (SSG or SSR) as in your existing application.
- When asked if you are building for Sitecore XM Cloud, answer y to install the XM Cloud add-on.
- Select other add-ons used by your existing application and press Enter.
The script then installs the application dependencies.
Next steps
To finalize the upgrade process, make sure you resolve any errors and warnings you encounter. Enable debug logging for JSS specific issues to assist you if necessary.
