You can create component using CLI: sitecore-tools project component scaffold <component name> e.g. sitecore-tools project component scaffold RichText
component auto register in component-map.ts file
Multilingual in Content SDK
Internationalization using next-intl
A Content SDK app created from the Next.js App Router template ships with built-in integration for internationalization using next-intl. The integration handles the following: Locale-aware routing (including multisite support).Server and client component translation access patterns. Dictionary phrase retrieval from Sitecore per site (namespaced by siteName).You declare supported locales, configure the default locale, and control prefix behavior in src/i18n/routing.ts. You provide server-only resolution of locale plus dictionary phrases in src/i18n/request.ts.
Configuration files
Your application directory's i18n folder contains two integration files provided by the next-intl package to support internationalization.
src/i18n/routing.ts - You must use this file to configure the following:
All supported locales Default language Locale prefix settingSee the following example of the routing.ts file:
typescript
MSI Editor
import { defineRouting } from "next-intl/routing";
import sitecoreConfig from "sitecore.config";
export const routing = defineRouting({
  // A list of all locales that are supportedlocales: [sitecoreConfig.defaultLanguage, "de-DE", "fr-FR",, "es-US", "ko-KR"],
  // Used when no locale matches
  defaultLocale: sitecoreConfig.defaultLanguage,
  // No prefix is added for the default locale ("as-needed")
  // For other configuration options, refer to the next-intl documentation:
  // https://next-intl.dev/docs/routing/configuration
  localePrefix: "as-needed",
});
2. src/i18n/request.ts - This file exposes the defineRequestConfig function from next-intl and resolves, per request, the current locale and associated dictionary phrases from Sitecore. This is then used by server components that can't use hooks.
Component internationalization
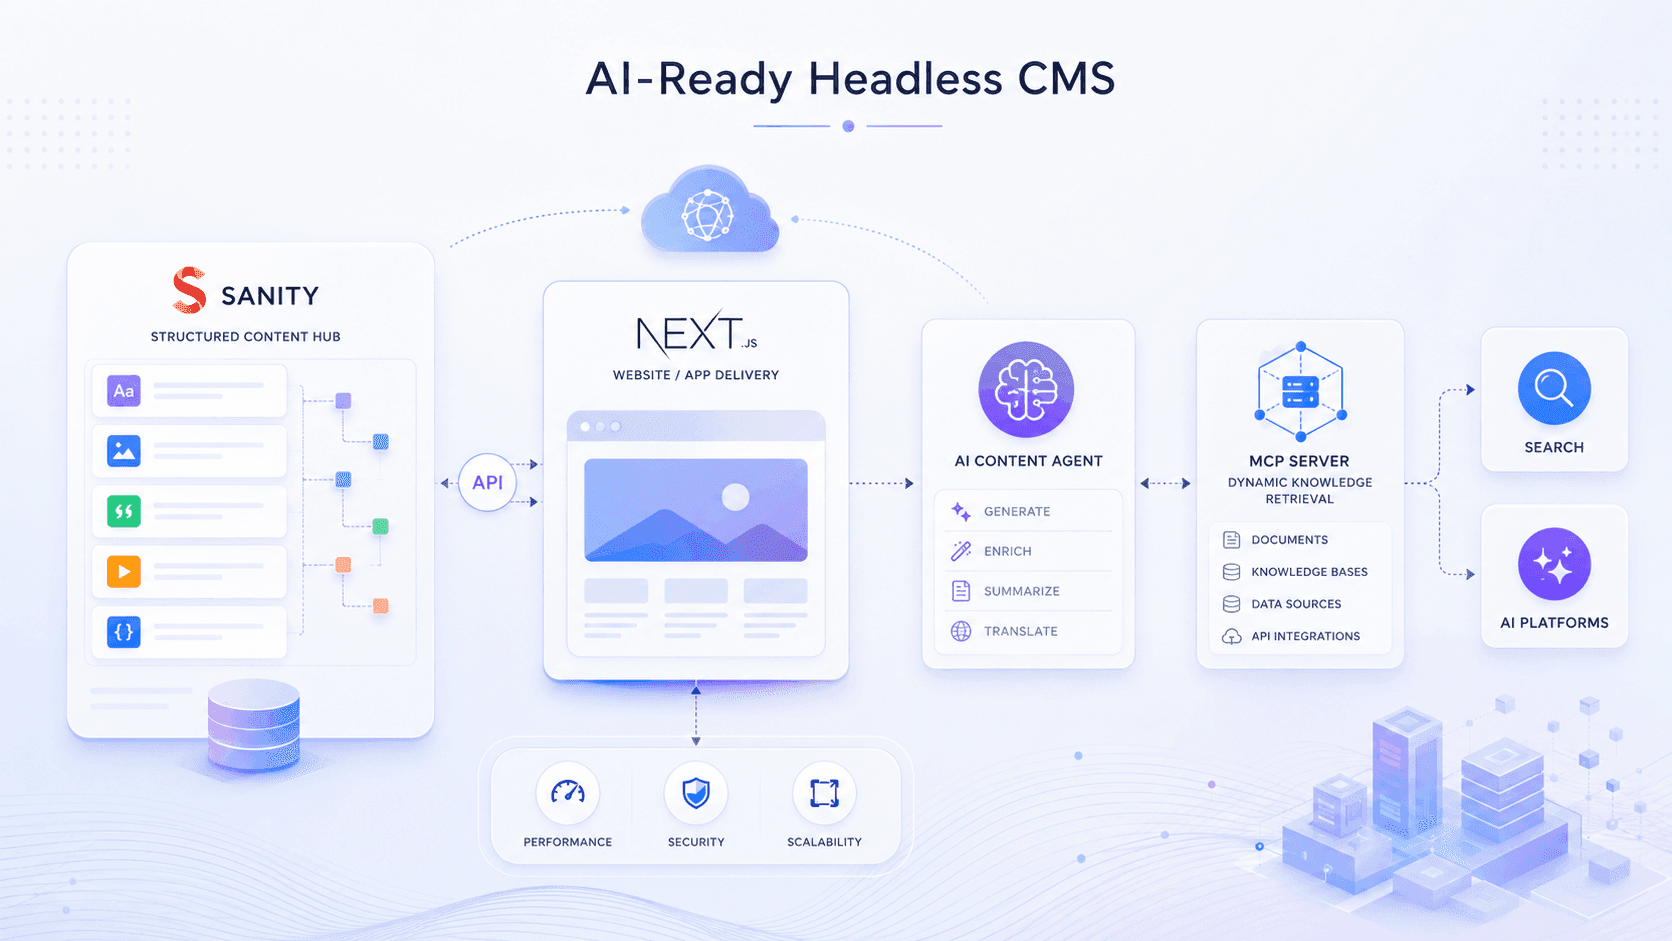
Transform Your Sitecore Platform into a Future-Ready Headless Experience
Because of Next.js App Router semantics, translation access differs between async server components, regular server components, and client components. All translation retrieval in this setup is ultimately backed by phrases fetched from Sitecore using the dictionary service in request.ts, namespaced by page.siteName (or equivalent context), ensuring isolation across sites. For more information, see Internationalization of Server and Client Components.
Async server components - primarily fetch data and cannot use hooks. To support this next-intl provides awaitable versions of the functions that you usually call as hooks from within the components. You can use them as shown:
3. Client components - receive locale and messages through NextIntlClientProvider, which the template adds by default to the catch-all route, Page.tsx. Client components use the same functions as the non-async server components:
'use client' import { useTranslations } from 'next-intl'; const t = useTranslations(); To retrieve the current locale, you can the appropriate API based on the component type as shown: // Regular Server & Client Components import { useLocale } from 'next-intl'; const locale = useLocale(); // Async Server Components import { getLocale } from 'next-intl/server'; const locale = await getLocale();
Create New Item from Template in Sitecore
Using the Content Editor (Classic Interface)
Open the Content Editor from the Launchpad.
Select the item in the content tree where you want the new item to live (parent) or be next to (sibling).
On the Home tab, in the Insert group, click the arrow.
Choose to Insert a new sibling or Insert a subitem, or click Insert from template to pick a specific template (e.g., Article, Product).
Name the item (no special characters) and click OK or Insert.
Edit the fields for the new item in the right pane.
Create New Component in Sitecore
Creating a component in Sitecore involves a blend of back-end configuration in the Sitecore Content Editor and front-end development in your rendering application (e.g., Next.js, ASP.NET Core).
The general workflow for creating a custom component in a modern headless Sitecore environment with SXA (Sitecore Experience Accelerator) is:
1. Define the Data Template in Sitecore
First, you create a template to define the data structure (fields) that your component will use.
In the Content Editor, navigate to /sitecore/Templates/ and create a new folder for your project/feature.
Inside the folder, create a New Template (e.g., "MyComponentData").
On the Builder tab, add sections and fields (e.g., "Title" as Single-Line Text, "Content" as Rich Text) that content authors will fill in.
Save the template.
2. Create the Rendering Definition in Sitecore
Next, you define the rendering item that links the data template to the front-end code.
Navigate to /sitecore/Layout/Renderings/ and create a folder for your custom components.
Right-click the folder and click Insert > JSON Rendering (for headless) or Component (using the SXA wizard).
Name the rendering (e.g., "MyComponent").
In the new rendering item's fields:
Set the Datasource Template to the template you created in Step 1. Define a Datasource Location (e.g., query:$site/*[@@name='Data']/*[@@name='MyComponentDataSources']) to specify where the data items should be stored in the content tree.
Save the item.
3. Develop the Front-end Component
This step involves creating the actual visual component in your front-end application (React, Next.js, etc.).
Navigate to your front-end project's components directory (e.g., src/components).
Create a new file with the exact same name as the rendering definition (e.g., MyComponent.tsx for Next.js).
Write the code to receive the data via props and render the fields using the appropriate Sitecore SDK components (e.g., <Text field={props.fields.Title} />).
4. Register and Deploy
Ensure Sitecore recognizes the new component.
If using JSS, the component needs to be registered in your application's Component Factory.
Deploy your front-end code and Sitecore items (if not using a Sitecore-first workflow where this is done via a script).
5. Add to the Page in Experience Editor
Finally, a content author can add the component to a page.
Open the Sitecore Experience Editor or Pages app.
Drag the newly created component from the components list onto a placeholder on your page.
Add content to the component's fields. The component will render dynamically on the page.
Create component in sitecore
go to sitecore panel and login go to sitecore->project->sites->projectfolder->home(pagefolder)->presentation details ->final layout->edit->controls->click on add button->feature->headless experience accelerator->page content->Rich Text(select template) and enter placeholder and enter OK go to sitecore->project->sites->projectfolder->home(pagefolder)->presentation details ->final layout->edit->controls->select component ->edit->select browse data->select an existing content item(Texts(current site))or copy an existing file
Add version language in sitecore (multilingual)
go to /sitecore/content/projectfolder/sites/site folder/Data/Texts(data or item folder)/aboutdata(itemname file)
on right side select language(english, korean, spanish,etc) anyone and update data and save this.
Sitecore manages multilingual data through a robust system that includes language configuration, content versioning, translation workflows, and languagefallback mechanisms. This allows organizations to deliver localized content to a global audience while maintaining brand consistency.
Key Aspects of Multilingual Data Management in Sitecore
Language Configuration: Sitecore allows you to define and manage languages at three levels: the system (instance), environment, and site level. You can add predefined languages (e.g., en-US, en-GB) or create custom ones via the Content Editor under /sitecore/System/Languages.
Content Versioning: For each content item (pages, components, etc.), Sitecore allows the creation of different language versions. Content authors can switch between languages using a dropdown menu in the Content Editor or Page/Experience Editor to create and edit translations for specific versions.
Language Fallback: This crucial feature ensures that if a specific language version of a page or field is missing, content from a designated fallback language is displayed instead, preventing blank pages. You can set up multi-tier fallback chains (e.g., Australian English falls back to standard English) at both the item and field levels.
Translation Workflows: Sitecore supports the integration of external Translation Management Systems (TMS) and connectors (like Smartling) to automate the translation process. Content can be moved into a "Ready for Translation" workflow state, automatically sending it to a translation service and importing the translated content once complete.
Dictionary System: For static text elements like button labels, navigation links, and error messages, Sitecore uses a centralized Dictionary system. This allows developers to reference keys in templates, and the correct localized phrase is displayed automatically based on the user's current language.
Language Switcher and URL Routing: You can implement a language switcher (e.g., a dropdown) on your website to let users seamlessly switch languages. Sitecore manages language context through query parameters (?sc_lang=es-MX) or by embedding the language code directly into the URL structure for better SEO.
SEO Optimization: Sitecore facilitates multilingual SEO through features like adding hreflang tags to guide search engines to the correct language-specific pages and managing localized metadata.
Implementation Methods
The approach to implementing multilingual support can vary based on the Sitecore architecture used:
Sitecore XP/XM (traditional): Content is managed directly in the Content Editor, leveraging standard features like language versions and workflows.
Sitecore Headless (JSS/XM Cloud): Content is fetched via the Layout Service API, using parameters to specify the requested language. The front-end application (e.g., Next.js) then handles the rendering, routing, and language switching on the client side.
Sitecore SXA (Experience Accelerator): SXA provides built-in scripts and tools (like the Site Manager) to quickly add languages to a site and manage language fallback settings.